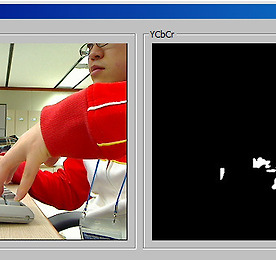
'색 추적'에 해당되는 글 3건
빨강 추적빨강 추적
Posted at 2010. 2. 19. 00:51 | Posted in Project/증강현실을 이용한 사천성분명 중심도 구하고
cvCircle 함수도 썼는데 왜 안되나 했었더니,
원본 영상 이미지를 다시 출력해주는걸 깜박했다ㅋㅋ
이런 어이없는 실수를 ㅋㅋ
void CameraManager::DrawCircle () { int i = 0; int j = 0; int counter = 0; CvPoint m_ptRed = cvPoint(0, 0); CRect rect; int x, y; this->pDC = this->originalCam->GetDC(); //Picture Box의 영역을 구함 this->originalCam->GetClientRect(&rect); x = rect.top; y = rect.left; rect.SetRect(x, y, x + CAM_WIDTH, y + CAM_HEIGHT); // 중심 구하기 for (i = 0 ; i < this->camera.Get_ipl_gray_Image()->height ; i++) { for (j = 0 ; j < this->camera.Get_ipl_gray_Image()->widthStep ; j++) { if ((this->camera.Get_ipl_gray_Image()-> imageData[i * this->camera.Get_ipl_gray_Image()->widthStep + j])!=0) { m_ptRed.x += j; m_ptRed.y += i; counter++; } } } // 원그리기 if(counter != 0) { m_ptRed.x = m_ptRed.x / counter; m_ptRed.y = m_ptRed.y / counter; cvCircle(this->camera.Get_ipl_OriginalImage(), m_ptRed, 20, CV_RGB(255,0,0), 3); } // Original Image View this->camera.Get_cvv_OriginalImage().CopyOf ( this->camera.Get_ipl_OriginalImage() ); this->camera.Get_cvv_OriginalImage().DrawToHDC(this->pDC->m_hDC, rect); this->originalCam->ReleaseDC(this->pDC); }
'Project > 증강현실을 이용한 사천성' 카테고리의 다른 글
증강현실을 MFC로 이식 성공 (2) | 2010.02.23 |
---|---|
경과 시간 계산 및 일정시간이상 일정 범위 안의 좌표에 있으면 클릭 (2) | 2010.02.20 |
빨강 추적 (1) | 2010.02.19 |
영상 속도가 느린 이유 (0) | 2010.02.18 |
영상처리를 이용한 붉은색 검출 (8) | 2010.02.17 |
AR을 이용한 사천성 알 출력 (0) | 2010.02.17 |
영상 속도가 느린 이유영상 속도가 느린 이유
Posted at 2010. 2. 18. 23:59 | Posted in Project/증강현실을 이용한 사천성이틀동안 영상 속도가 느려서 고민했는데, 정말 뜻밖의 곳에서 해결책을 찾았다.
필터링을 하면서 많이 느려졌고,
Thread 보다는 OnTimer로 호출하는게 더 빨랐다.
그리고 이진화 할때 YCbCr값 중에서 Y값은 설정을 안했는데,
같이 설정해주니까 (당연히) 색깔 검출이 잘 되었다.
지금 화면이 팽창->침식->팽창 연산만 하고
라벨링 이라던지 열림 연산이라던지 다 뺐다.
어차피 마커가 인쇄된 흰 종이를 수직으로 비추면서 시연할테니까,
이런 필터링들이 없어도 깨끗하게 잘 추출하더라.
이제 좌표값 얻어와서 포인트 잡아주는 일 남았구나.
void CameraManager::AddEffect () { IplConvKernel *element = cvCreateStructuringElementEx(2, 2, 1, 1, CV_SHAPE_ELLIPSE, NULL); cvDilate(this->camera.Get_ipl_bin_Image(), this->camera.Get_ipl_bin_Image(), element, 1); // 팽창 (배경을 축소시키고 객체의 크기를 확장) cvErode(this->camera.Get_ipl_bin_Image(), this->camera.Get_ipl_bin_Image(), element, 2); // 침식 (배경을 확장시키고 객체의 크기를 축소) cvDilate(this->camera.Get_ipl_bin_Image(), this->camera.Get_ipl_bin_Image(), element, 1); // 팽창 cvCvtColor(this->camera.Get_ipl_bin_Image(), this->camera.Get_RGB_Image(), CV_YCrCb2BGR); // YCrCb -> RGB cvCvtColor(this->camera.Get_RGB_Image(), this->camera.Get_ipl_gray_Image(), CV_RGB2GRAY); // RGB -> Gray // 이진화 cvThreshold(this->camera.Get_ipl_gray_Image(), this->camera.Get_ipl_gray_Image(), THRESHOLD, 255, CV_THRESH_BINARY | CV_THRESH_OTSU); }
'Project > 증강현실을 이용한 사천성' 카테고리의 다른 글
경과 시간 계산 및 일정시간이상 일정 범위 안의 좌표에 있으면 클릭 (2) | 2010.02.20 |
---|---|
빨강 추적 (1) | 2010.02.19 |
영상 속도가 느린 이유 (0) | 2010.02.18 |
영상처리를 이용한 붉은색 검출 (8) | 2010.02.17 |
AR을 이용한 사천성 알 출력 (0) | 2010.02.17 |
RGB->YCbCr->이진화 (2) | 2010.02.15 |
영상처리를 이용한 붉은색 검출영상처리를 이용한 붉은색 검출
Posted at 2010. 2. 17. 23:29 | Posted in Project/증강현실을 이용한 사천성우선 붉은 색 검출에 성공을 하긴 했는데
속도가 느리다.
한눈에 '느리다' 라는 느낌이 든다.
OnPaint 함수를 사용해서 OpenCV관련 처리들을 해주는데,
OnPaint함수 특성상 계~속 호출이 되기 때문에 발생하는 현상같다.
이제 코드를 모두 Thread화 시키는 작업을 하고, 색 추적 구현을 해야겠다.
void CameraManager::FindRedColor (CDC** pDC_YCbCr, CStatic *yCbCrCam) { CRect rect; int x, y; this->camera.Create_ipl_YCbCr_Image(); this->camera.Create_ipl_bin_Image(); this->camera.Create_RGB_Image(); this->camera.Create_Y_Image(); this->camera.Create_Cb_Image(); this->camera.Create_Cr_Image(); this->camera.Create_ipl_gray_Image(); *pDC_YCbCr = yCbCrCam->GetDC(); yCbCrCam->GetClientRect(&rect); x = rect.top; y = rect.left; rect.SetRect(x, y, x + CAM_WIDTH, y + CAM_HEIGHT); //RGB -> YCbCr로 변환 cvCvtColor(this->camera.Get_ipl_OriginalImage(), this->camera.Get_ipl_YCbCr_Image(), CV_RGB2YCrCb); //YCbCr 3개의 채널을 각 각 채널로 분리 cvCvtPixToPlane(this->camera.Get_ipl_YCbCr_Image(), this->camera.Get_Y_Image(), this->camera.Get_Cr_Image(), this->camera.Get_Cb_Image(), 0); ChangeRedColor (); AddEffect (); // 이진화 Image View this->camera.Get_cvv_bin_Image().CopyOf ( this->camera.Get_ipl_gray_Image() ); this->camera.Get_cvv_bin_Image().DrawToHDC( (*pDC_YCbCr)->m_hDC, rect ); //이미지 해제 this->camera.Release_ipl_YCbCr_Image(); this->camera.Release_Y_Image(); this->camera.Release_Cb_Image(); this->camera.Release_Cr_Image(); this->camera.Release_RGB_Image(); this->camera.Release_ipl_gray_Image(); this->camera.Release_ipl_bin_Image(); } void CameraManager::ChangeRedColor () { unsigned char temp_Y = 0; unsigned char temp_Cb = 0; unsigned char temp_Cr = 0; for(int i = 0 ; i < (this->camera.Get_ipl_YCbCr_Image())->height ; i++) { for(int j = 0 ; j < this->camera.Get_ipl_YCbCr_Image()->width ; j++) { temp_Cr = this->camera.Get_Cr_Image()->imageData[i * this->camera.Get_Cr_Image()->widthStep + j]; temp_Cb = this->camera.Get_Cb_Image()->imageData[i * this->camera.Get_Cb_Image()->widthStep + j]; // 붉은색이 있으면 흰색,아니면 검은색으로 if( (MIN_RED_CR < temp_Cr) && (temp_Cr < MAX_RED_CR) ) { if( (MIN_RED_CB < temp_Cb) && (temp_Cb < MAX_RED_CB) ) { //검출 영역이면 흰색 this->camera.Get_ipl_bin_Image()-> imageData[i * this->camera.Get_ipl_bin_Image()->widthStep + j * 3 + 0] = WHITE; this->camera.Get_ipl_bin_Image()-> imageData[i * this->camera.Get_ipl_bin_Image()->widthStep + j * 3 + 1] = WHITE; this->camera.Get_ipl_bin_Image()-> imageData[i * this->camera.Get_ipl_bin_Image()->widthStep + j * 3 + 2] = WHITE; } else { //검출 영역이 아니면 0 this->camera.Get_ipl_bin_Image()-> imageData[i * this->camera.Get_ipl_bin_Image()->widthStep + j * 3 + 0] = BLACK; this->camera.Get_ipl_bin_Image()-> imageData[i * this->camera.Get_ipl_bin_Image()->widthStep + j * 3 + 1] = BLACK; this->camera.Get_ipl_bin_Image()-> imageData[i * this->camera.Get_ipl_bin_Image()->widthStep + j * 3 + 2] = BLACK; } } else { //검출 영역이 아니면 0 this->camera.Get_ipl_bin_Image()-> imageData[i * this->camera.Get_ipl_bin_Image()->widthStep + j * 3 + 0] = BLACK; this->camera.Get_ipl_bin_Image()-> imageData[i * this->camera.Get_ipl_bin_Image()->widthStep + j * 3 + 1] = BLACK; this->camera.Get_ipl_bin_Image()-> imageData[i * this->camera.Get_ipl_bin_Image()->widthStep + j * 3 + 2] = BLACK; } } } } void CameraManager::AddEffect () { // 구조화 요소 Create IplConvKernel *element = cvCreateStructuringElementEx(2, 2, 1, 1, CV_SHAPE_ELLIPSE, NULL); // 닫힘 연산 cvDilate(this->camera.Get_ipl_bin_Image(), this->camera.Get_ipl_bin_Image(), element, 1); // 팽창 (배경을 축소시키고 객체의 크기를 확장) cvErode(this->camera.Get_ipl_bin_Image(), this->camera.Get_ipl_bin_Image(), element, 2); // 침식 (배경을 확장시키고 객체의 크기를 축소) cvDilate(this->camera.Get_ipl_bin_Image(), this->camera.Get_ipl_bin_Image(), element, 1); // 팽창 cvMorphologyEx(this->camera.Get_ipl_bin_Image(), this->camera.Get_ipl_bin_Image(), this->camera.Get_ipl_YCbCr_Image(), element, CV_MOP_OPEN, 5); cvSmooth(this->camera.Get_ipl_bin_Image(), this->camera.Get_ipl_bin_Image(), CV_MEDIAN, 3, 1); cvSmooth(this->camera.Get_ipl_bin_Image(), this->camera.Get_ipl_bin_Image(), CV_GAUSSIAN, 3, 1); cvCvtColor(this->camera.Get_ipl_bin_Image(), this->camera.Get_RGB_Image(), CV_YCrCb2BGR); // YCrCb -> RGB cvCvtColor(this->camera.Get_RGB_Image(), this->camera.Get_ipl_gray_Image(), CV_RGB2GRAY); // RGB -> Gray // 이진화 cvThreshold(this->camera.Get_ipl_gray_Image(), this->camera.Get_ipl_gray_Image(), THRESHOLD, 255, CV_THRESH_BINARY | CV_THRESH_OTSU); cvReleaseStructuringElement(&element); // 구조화 요소 Release }
'Project > 증강현실을 이용한 사천성' 카테고리의 다른 글
빨강 추적 (1) | 2010.02.19 |
---|---|
영상 속도가 느린 이유 (0) | 2010.02.18 |
영상처리를 이용한 붉은색 검출 (8) | 2010.02.17 |
AR을 이용한 사천성 알 출력 (0) | 2010.02.17 |
RGB->YCbCr->이진화 (2) | 2010.02.15 |
OpenCV로 영상 출력 성공, 하지만.. (0) | 2010.02.10 |
-
KimJaebo이거 MFC기반으로 만드신건가요??? 혹시 가능하시다면 제 메일로 풀소스좀 주실수 있으신지요??
부탁드립니다.
chimera01@naver.com-
2010.05.11 19:16 신고 [Edit/Del]MFC로 만든 소스 맞습니다.
저 부분은 제가 구현한거지만,
3인 프로젝트라서 풀소스를 보내드리기엔
무리가 있네요. 죄송합니다^^
-
-
-
2010.12.21 23:24 신고 [Edit/Del]CameraManager에는 증강현실 관련 처리가 없습니다^^
그리고 증강현실과 Picking부분은 팀원이 한거라서 답변을 드릴수가없네요^^ 제가 한 부분은, 전체적인 UI와 Class diagram 설계, 색추적 입니다^^
-
-
삽질백만년소스 중간쯤에 빨간색 검출하는 부분에서 MIN_RED_CR, MAX_RED_CR , MIN_RED_CB , MAX_RED_CB 값이 어떻게 되죠??
그리고 어떻게 구하셨는지,, 지금 저는 파란색 검출하려고하는데 Cr, Cb 값을 몰라서 삽질중,, ㅜㅜ -
-
2012.06.03 16:10 신고 [Edit/Del]보다 정확한 색 검출을 위해 YCbCr로 변환시키고,
색 검출 로직이 끝나면
화면에 출력해주기 위해 RGB로 다시 변환시켜 주는겁니다.
-